1984-85 Accord
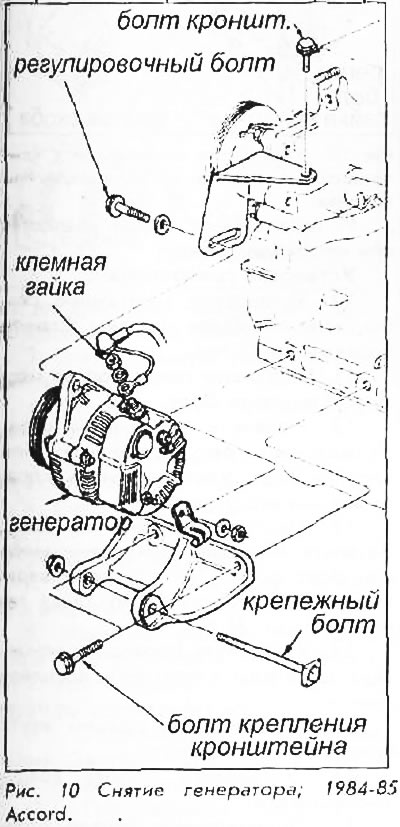
1. With the ignition off, disconnect the wire going to the negative battery terminal.
2. Disconnect the wiring harness from the generator and remove the nut from the terminal.
3. Remove the adjusting bolt; loosen the mounting bolt nut.
4. Having rejected the generator towards the engine, remove a belt.
5. Remove the mounting bolts from the generator bracket holding it to the engine and remove the generator with bracket.
For installation:
6. Install generator and bracket. Hand tighten the bolts and install the belt. Tighten the bolts on the mounting bracket and the alternator main mounting bolt to 45 Nm.
7. Install the adjusting bolt, adjust the belt tension and tighten the nut to 22 Nm.
8. Insert the wiring harness, fix the terminal with a nut.
9. Connect a wire from the negative plug of the accumulator.
10. If a hoist was used during installation, be sure to reinstall the protective cover.
1986-1989 Accord
1. Disconnect the wire from the negative battery terminal.
2. Raise and securely fix the car.
3. To remove a protective casing from below from the engine.
4. Disconnect the left drive shaft from the control joint. The disconnection procedure is described in chapter 7.
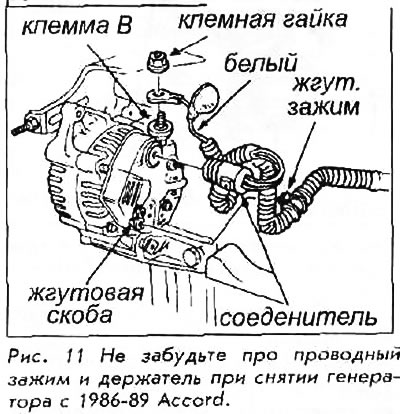
5. Disconnect the harness connector at the rear of the generator. Remove the clamp from the harness bracket.
6. Remove the end nut from the wiring harness and disconnect the white wire from terminal B.
7. Remove the alternator top bolt along with the nut, then remove the belt from the alternator pulley.
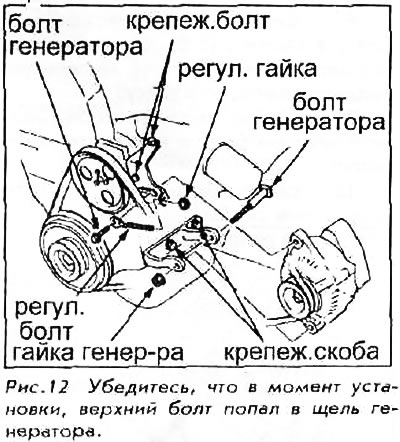
8. While supporting the generator, remove the intermediate bolt and remove the generator.
9. The alternator mounting bracket can also be removed if required.
Generator installation:
10. Carefully insert the generator into the mount; hand tighten the intermediate bolt. Put the belt on the pulley.
11. Establish the top bolt of the generator. Make sure it goes through the adjustment bolt hole.
12. Adjust belt tension. Tighten the nut on the middle bolt to 45 Nm and tighten the top bolt to 24 Nm.
13. Connect the white wire to terminal B and tighten with a nut.
14. Connect wiring harness to alternator and secure with harness clip.
15. Reconnect the left drive shaft to the control joint.
16. Install the protective cover. Lower the car.
17. Connect a wire of the negative plug of the accumulator.
1990-91 Accord
1. With the ignition off, disconnect the wire from the negative battery terminal.
2. Remove the power steering pump. Details in chapter 8.
3. Remove the optimum speed control actuator (cruise control), but do not unplug its cable.
4. Disconnect the multi-pin connector.
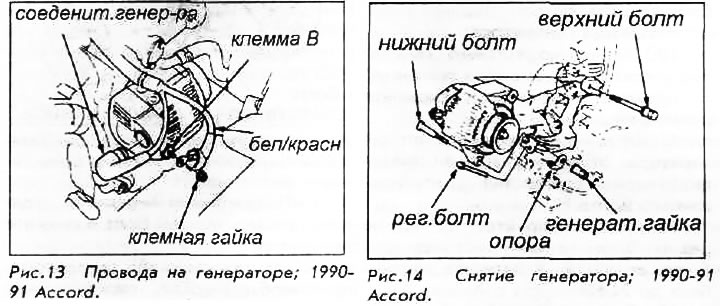
5. Remove end nut and disconnect wire from terminal B.
6. Loosen the adjusting bolt; remove the alternator nut.
7. Remove the belt from the alternator pulley.
8. Remove the adjusting bolt as well as the spacer bolt below and the small support post.
9. Without releasing the generator, remove the top bolt and remove the generator.
10. If necessary, remove mounting brackets.
Generator installation:
11. If the generator mounting brackets were removed, install them. Coat the bolts with thread lubricant or fluid. Install the bolts in the brackets and tighten them to 50 Nm.
12. Fit the generator in place. Install the top bolt and tighten it to 45 Nm.
13. Then install the bottom bolt and adjusting bolt. Make sure the adjusting bolt is set correctly.
14. Put the belt on the pulley. Install the alternator nut. Adjust belt tension. Tighten the alternator nut to 26 Nm.
15. Connect the wire to terminal B and tighten with a nut.
16. Connect the multi-pin connector to the generator.
17. Install the average speed optimization block (cruise control).
18. Install the power steering pump.
19. Connect a wire of the negative plug of the accumulator.
1984-87 Prelude
1. Disconnect the wire from the negative battery terminal.
2. Remove the air cleaner assembly.
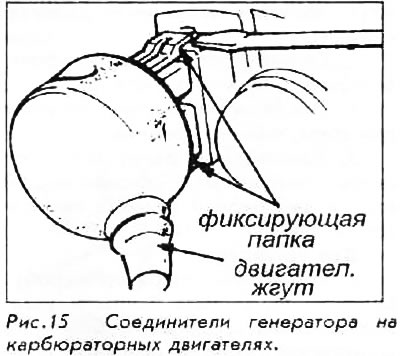
3. On carbureted engines, disconnect the engine wiring harness. There are locking tabs on the top and bottom of the connector; lift both tabs at the same time, then pull and disconnect the connector.
4. On fuel injected engines, disconnect the connector from the alternator and remove the clip from the harness bracket.
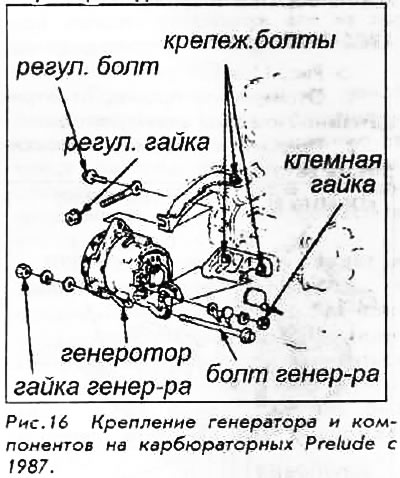
5. Remove the terminal nut; disconnect the wire.
6. On carbureted engines, remove the alternator adjusting bolt and nut, then remove the belt from the pulley.
7. On engines with fuel injection, remove the alternator bolt and nut and remove the belt from the pulley.
8. Remove the bottom bolt and remove the generator.
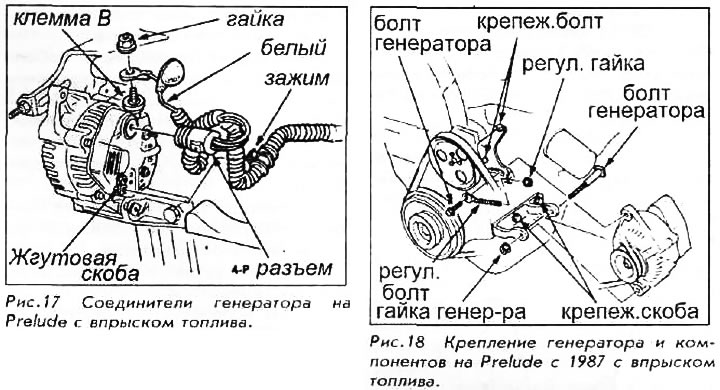
9. Mounting brackets are removed if necessary.
Generator installation:
10. Install mounting brackets if removed. Tighten with bolts to 45 Nm.
11. Fit the alternator in place and install the bolt.
12. Put the belt on the pulley. Install the adjusting or top bolt. Make sure it is installed correctly.
13. Put the belt on the pulley. Tighten the lower alternator nut or bolt to 45 Nm. Tighten the top or adjusting nut of the alternator to 24 Nm.
14. Install the wires to the end latches and tighten with the end nut.
15. Connect the harness connector to the generator.
16. Install the air cleaner assembly.
17. Connect a wire of the negative plug of the accumulator.
1988-91 Prelude
1. Disconnect the wire from the negative battery terminal.
2. Disconnect the connector from the generator. Disconnect the wire harness clamp from the bracket.

3. Remove the terminal nut; disconnect the wire.
4. Loosen the bolt and adjusting nut.
5. Remove the alternator bolt, then remove the belt from the pulley.
6. To remove a bolt and to take out the generator.
Generator installation:
7. Install the generator in place and secure with a bolt.
8. Put the belt on the pulley, then install the alternator bolt. Make sure the alternator bolt is holding it in place.
9. Adjust belt tension. Tighten the bolt to 45 Nm and the alternator bolt to 25 Nm.
10. Connect the wire to terminal B and tighten with a nut.
11. Connect the wiring harness to the generator.
12. Connect a wire of the negative plug of the accumulator.
